1. Introduction
Welcome To HTmagazine
Firstly we would love to send our great thanks to you for purchasing HTmagazine theme. This documentation covers almost everything to guide you step by step from the start to have your site on air. We encourage you to read thoroughly all section before you go on.
Thanks again and enjoy building your website with HTmagazine theme.
WordPress Information
Before installing this theme, please make sure you have a working WordPress version already installed. Before we jump to the theme presentation we would like to provide some resources intended for users who are new to WordPress but it may also be useful for the more experienced users.
- WordPress Codex - general info about WordPress and how to install on your server
- First Steps With WordPress - general information that covers a wide variety of topics
- FAQ New To WordPress - the most popular FAQ’s regarding WordPress
1.0 : Theme Installation
You can install the theme in two different ways: through WordPress or via FTP.
- Download the htmagazine files from your ThemeForest account. Navigate to your Downloads tab on ThemeForest and find htmagazine. Click the Download button.
- Extract the ZIP package downloaded from ThemeForest to your desktop, in the extracted packag.After extracting files you will open the folder called htmagazine where you will find more folders (documentation, licensing, Dummy Content, Upload, etc.).
- Inside Upload folder you will find htmag.zip (this is the theme you want to install).
1.1 : WordPress Installation

- Login to WordPress Admin
- Navigate to Appearance → Themes.
- Click Install Themes and hit the upload button
- Browse to find the htmag.zip file on your computer and click Install Now
- Wait while the theme is uploaded and installed.
- Activate the newly installed theme. Go to Appearance → Themes and activate it.
1.2 : FTP Installation
- Log into your hosting space via an FTP software.
- Unzip the htmag.zip file and ONLY use the extracted htmag theme folder.
- Upload the extracted htmag theme folder into
- Activate the newly installed theme. Go to Appearance → Themes and activate it.
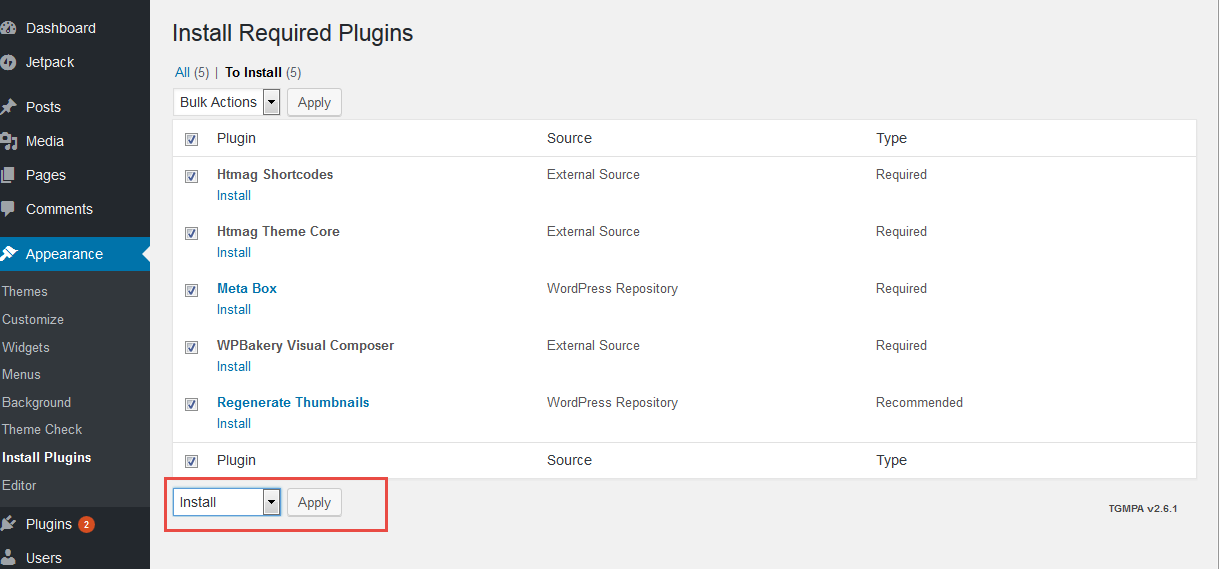
1.3 : Install Plugins
The theme requires the following plugin: Htmag Shortcodes,Htmag Theme Core,Meta Box,WPBakery Visual Composer and recommends the following plugins: Regenerate Thumbnails and Contact Forms 7.
Step 1 – After activating the theme, you will be asked to install the required and recommended plugins, you can proceed by clicking on Begin installing plugins.

Install and activate each plugin or not all of the theme features will be available.
Step 2 – In the next page, check all the plugins that you want to install then on the drop down Bulk Actions, choose Install then click Apply, the plugin installation process will start. Wait until all plugins activated then start customizing your website as you wish.
2.0 Importing Demo Content
Htmag Equipped with a feature Which provides you with the fastest and easiest way to import all the sample content (pages and posts, sliders, widgets, theme options) from our demo sites into your theme with a single click.
This is recommended to do on fresh installs.To import our demo content, please see the steps below.

How To Import Htmag Demos
- Install and activate these plugins if it is not installed before : WPBakery Visual Composer & Contact Forms 7
- Navigate to Theme Options > Demo Importer and click the “Import Demo ” button. Be sure to read the popup message.
- It can take a few minutes to import everything. Please be patient and wait for it to complete. Once it loads, you will see a “Success” message.
- That's it.
If it fails, you will have to request your webhost to increase your PHP max_execution_time (or any other webserver timeout to at least 300 secs) and memory_limit (to at least 196M) temporarily.
3.0 : Home Page Builder
This theme includes support for the Visual Composer plugin . The Visual Composer plugin add a ton of drag and drop modules to your dashboard for quickly and easily building your site.

The Visual Composer is very easy and doesn’t really need much explanation, have a look at the screenshots below for a quick guide (you can also view this more comprehensive Visual Composer guide).
- Make sure you have installed and activated the Visual Composer plugin.
3.1 HomPage : Using The Visual Composer
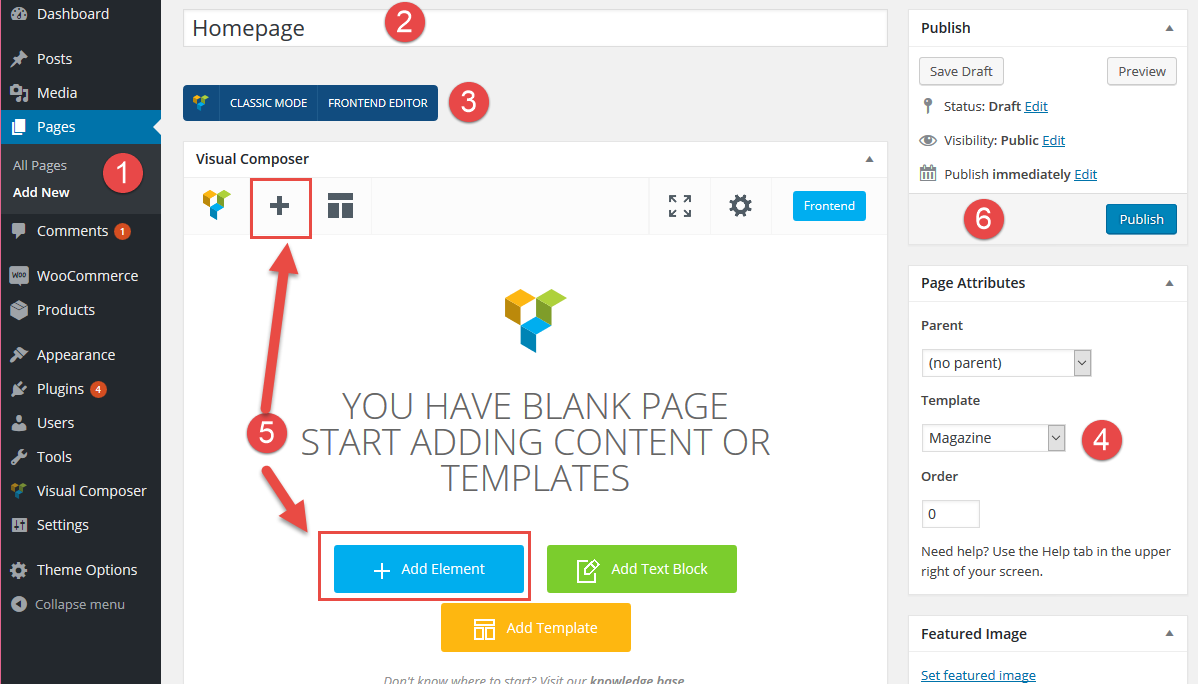
Step 1 – Create a new page, go to Pages -> Add New
Step 2 – Set the page title
Step 3 – Click Backend Editor button above the post editor.
Step 4 – Under Page Attributes, select Magazine as Template.

Step 5 – Click the + button or add element and create a row. Rows and columns are the first things you have to create. And then within these rows, you can click the "+" button to add the other elements.

3.2 Setting Up Homepage

Once you have created a page that you would like to use as your homepage, follow these steps:
Step 1 – Go to Settings > Reading.
Step 2 – Choose "A static page" option for Front page displays.
Step 3 – Next to Front Page, select the page you created to be used as the homepage.
Step 4 – Save Changes.
3.3 HTmagazine Block

We integrate 7 models of boxes. It is the most used in the construction of news sites and magazines ,News Box,News in Picture,Scroller ,Recent Posts,Video box ,ADS boxe and Feature Slider.
News Boxes

News in Picture

Scroller

Recent Posts

Video Box

4.0 Setup Navigation & Menus
HTmag supports custom WordPress menus, with multiple levels of dropdown support for the main menu. There are 2 areas of the theme where you can assign a menu; the main menu, the top menu.
4-1 : Existing Menu
Go to to Appearance > Menus.
In the "Manage Locations" area, under Main Navigation, select Main Menu and Top Menu. Click Save.

- Main Menu - this is the main menu that shows in the header area.
- Top Menu - this is the Top menu that shows in the top of header area.
To setup a new menu, please follow the steps below.
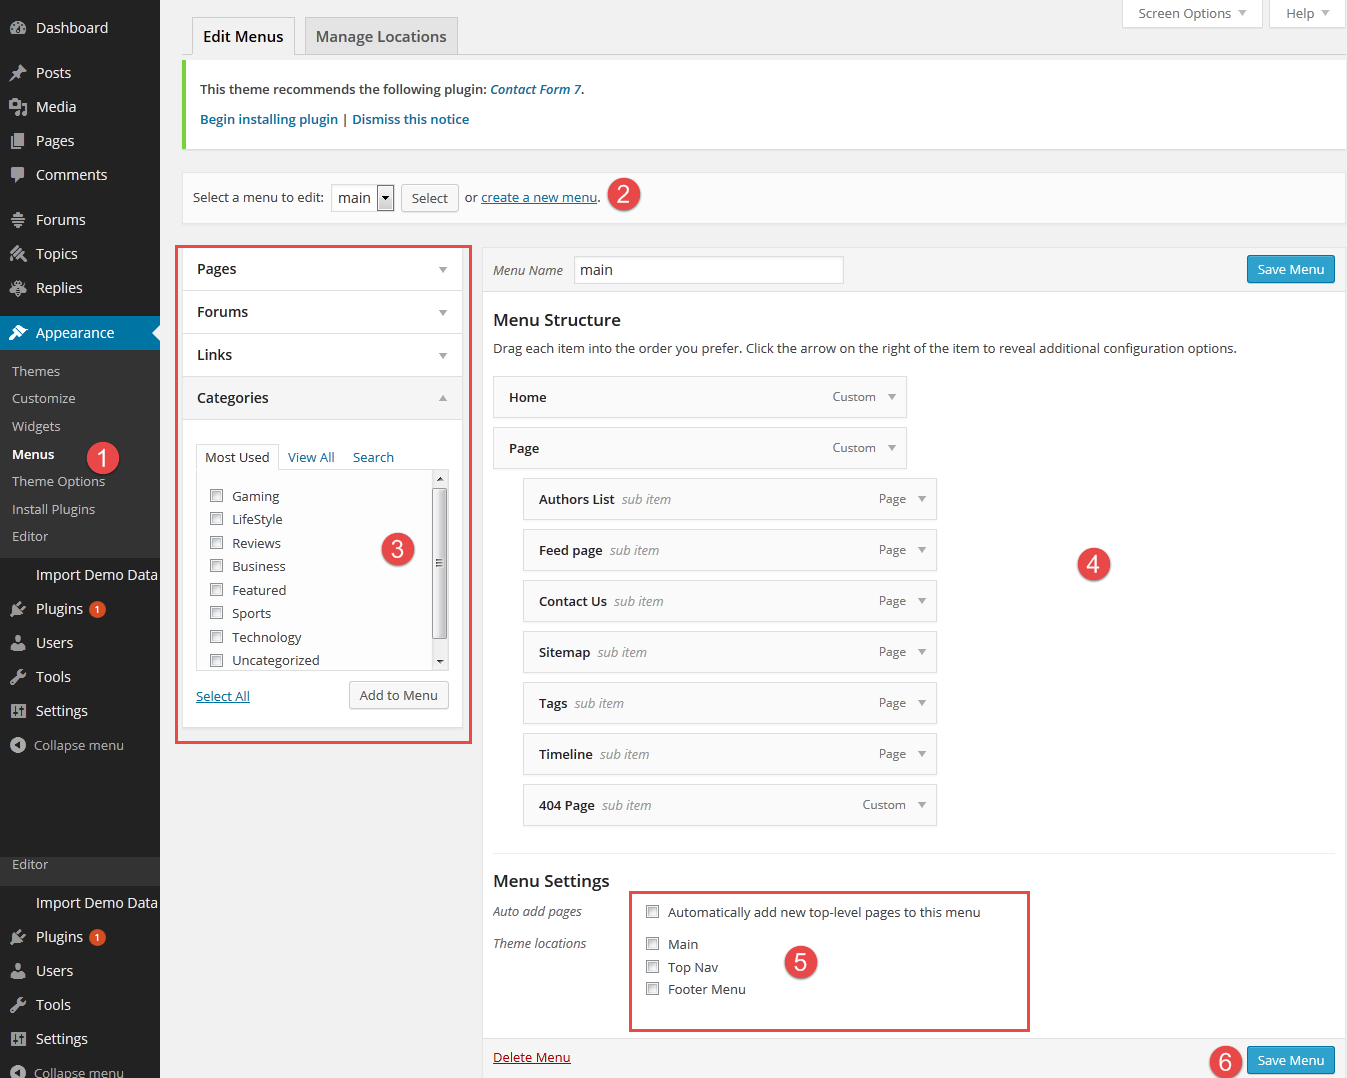
- Go to Apperance > Menus
- Click on the create a new menu link. Enter a menu name and click Create Menu.
- Using the Custom Links and Pages boxes at the left, add items to the menu.
- Manage your menus by using the drag and drop functionality. To create a dropdown menu, simply drag a menu item below and slightly to the right of another menu item and it will lock into place and create a dropdown section.
- After setting up your menu, scroll down to the bottom of the page to assign the menu to one of the 2 locations in the Theme Locations box..
- Click Save Menu and that is all.
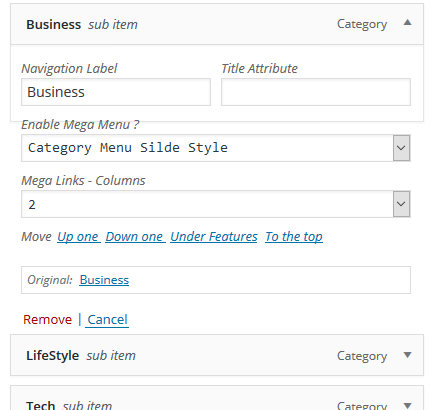
4.2 Mega Menus
4.2-1 Mega Menus : Category Silde Style

Category Mega Menu : Silde Style
The category mega menu is a 2 column mega menu that shows sub-categories in first column and 4 recent posts in the second.
- Go to Appearance > Menu
- Add menu items from the left panels (Pages, Links, Categories)
- Click on the menu item and select the Category that you want to use from the drop-down
- In Enable Mega Menu select the Category menu Slide Style
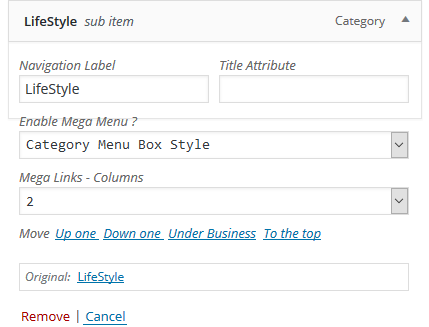
4.2-2 Mega Menus : Category Box Style

Category Mega Menu : Box Style
The category mega menu is a 2 column mega menu that shows sub-categories in first column and 4 recent posts in the second.
- Go to Appearance > Menu
- Add menu items from the left panels (Pages, Links, Categories)
- Click on the menu item and select the Category that you want to use from the drop-down
- In Enable Mega Menu select the Category menu Box Style
4.2-2 Mega Menus : Links Mega Menu

Links Mega Menu
The first one is used to create an organized multi-column list of links. We call it the "Links Mega Menu".
- Go to Appearance > Menu
- Add menu items from the left panels (Pages, Links, Categories)
- Click on the menu item and select the first level items Only First Level items can enable the Mega Menu.
- In Enable Mega Menu select the Mega Links
- Set the ‘Mega Menu Number of Columns’ option that will determine how many columns will be displayed.


5.0 Setup Categories
HTmag Is equipped with a great feature,Which enables you to customize your categories as you want with custom Category Listing Style,background, color, logo, sidebar or slider . To get a different category from other categories.

- Navigate toPosts menu > Categories
- Edit the category you want.
- From the Edit category page you can chnage the settings of your category as following :
5-1 : Category Listing Style

There are 6 layout styles .
- Default Style : his is the style you have chosen to be the default from Theme Settings. If you change the default from Theme Settings, the layout for this category will change too.
- Modern Style - 2 Columns : Shows the listing with a 2 column grid format.
- Blog Style 1: Shows category listing in a typical traditional blog layout (small image).
- Blog Style 2: Shows category listing in a typical traditional blog layout(Medium Image).
- Blog Style 3: Shows category listing in a typical traditional blog layout(Large image).
- Blog Style 4:Shows the listing Without image.
5-2 : Category Settings

- Choose Custom Sidebarfor the category .
- Choose Custom Sliderfor the category .
- Choose Custom Sidebar layout
5-3 : Category Logo
- Click to activate the Custom Logo.
- Choose between image Logo or category title.
- Click upload button and select your logo image file.
- Click upload button and select your retina logo .It needs to be exactly 2X the size of the regular logo
- If you are using a retina logo, you must enter the logo width .
- If you are using a retina logo, you must enter the logo height
- you can set the margin for your logo
5-4 : Category Style
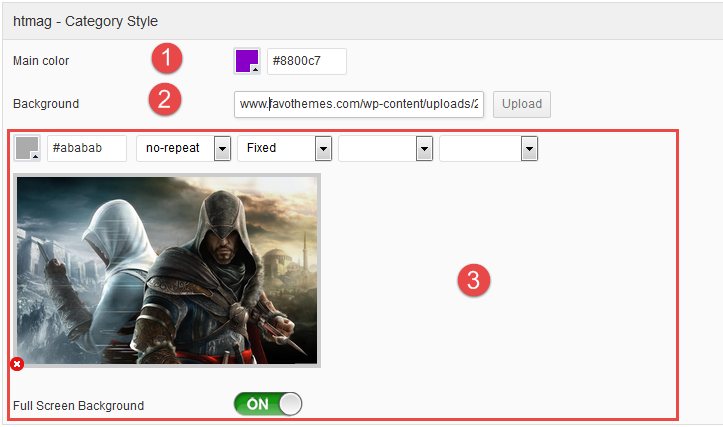
- Click on the small box to choose the main color,Which will place the default color in the selected category only.
- Click upload button and select your Background image.
- In this box you can customize the background color and properties.
5-5 : Archives Settings
From this section you Control and Manage all Article features ,Display style ,social buttons,posts meta and more...

6.0 Setup Posts
Add Post in Ward Press is very easy and does not require an in-depth explanation, For this we confine ourselves to explain the most important things and features only.
6-1 : Add New Post
- Navigate to Posts in your WordPress admin.
- Click on Add New to make a new post.

6-2 : Explain the Post Page
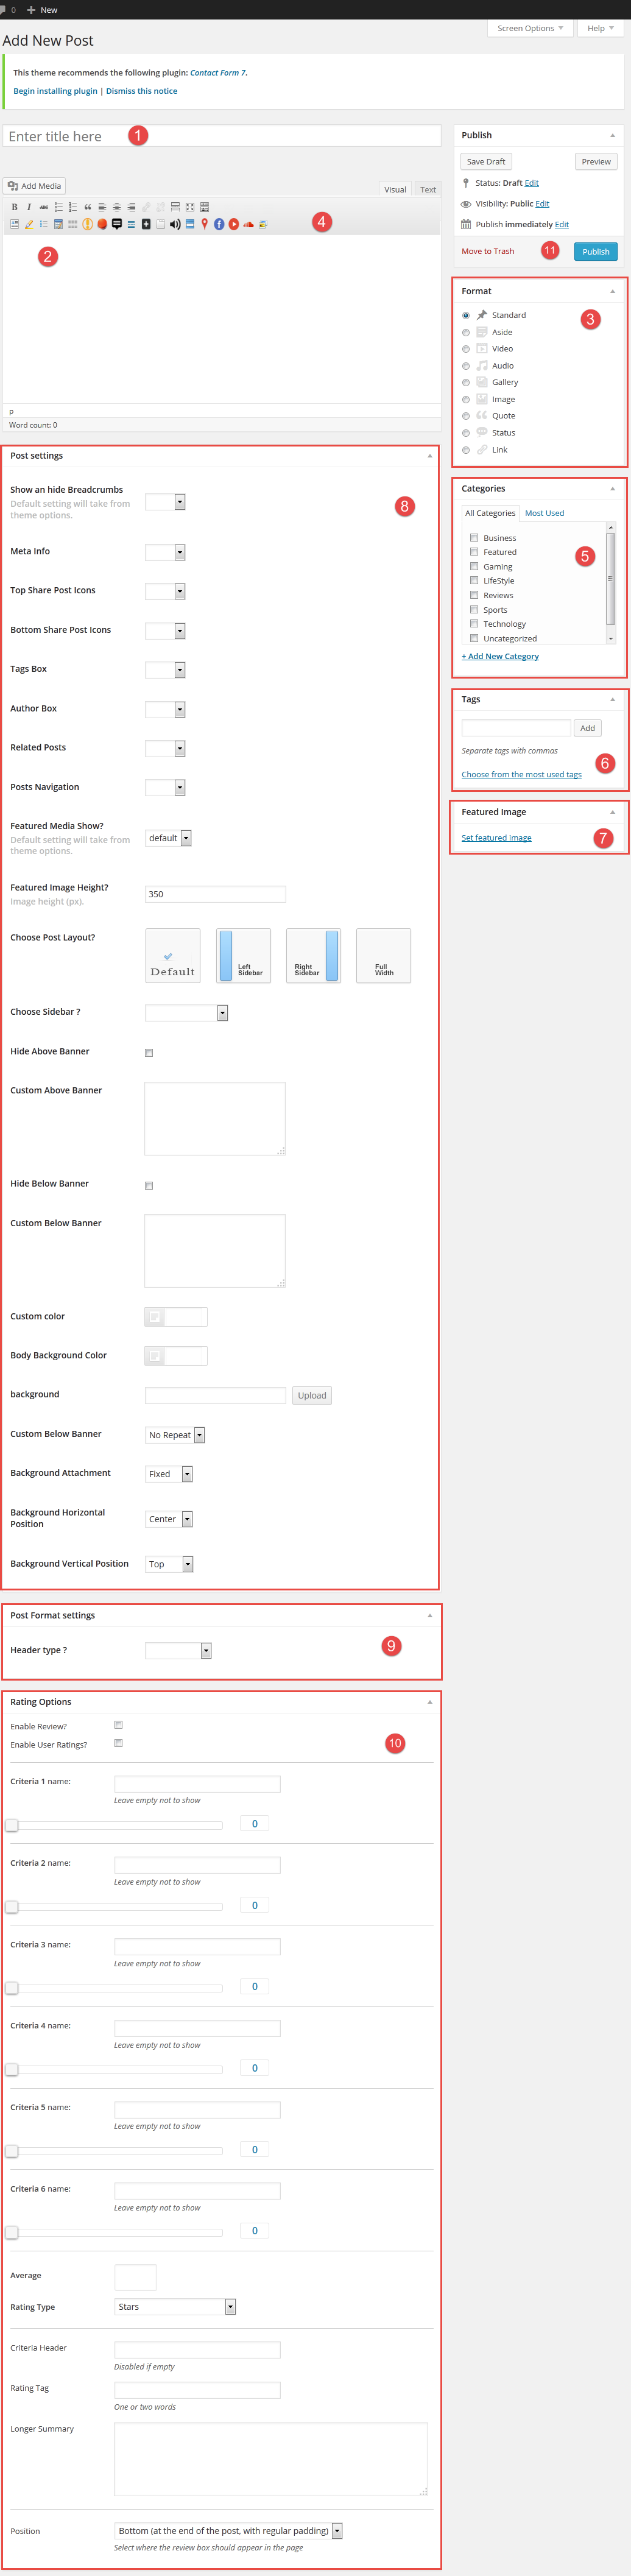
- Title Box : - Put your post title here.
- Shortcode : - .
- Content Area : - Post content goes here.
- Post Format : - You can choose the type of Post.
- Categories : - You can select the category or several categories or create a new category.
- Tags : - You can select tags or create new and Tags.
- Featured Image : - set your Featured Image.
- Post Settings : - You can customize all the features of Post like Sidebar,color,background and enable or disable any options.
- Post Format Settings : - Add Google Map Post format.
- Rating Options : - Add Review post.
- Publish : - When you finish the creation Your Post click Publish .
6-3 : Post Formats
you can create one of 10 different post formats. Standard,Aside, Video, Audio, Gallery ,image,Quote,Status and Link. Each of these formats structures you post differently, putting more focus on the type of content that the format represents.
When you write a blog post, you will notice a box to the right of your text editor called "Format." Within this box are the 9 format options. Choosing "Standard" will result in a normally-formatted blog post, while each other options has a unique design associated with the format type.

6-3.1 : Using The Video Post Format
Selecting the Video post format will place a video at the top of your post. It will also replace the standard Thumbnail image on post pages with a video embed. After you have selected the "Video" post format from within the Format options box, the next thing you need to do is add a video to your post.
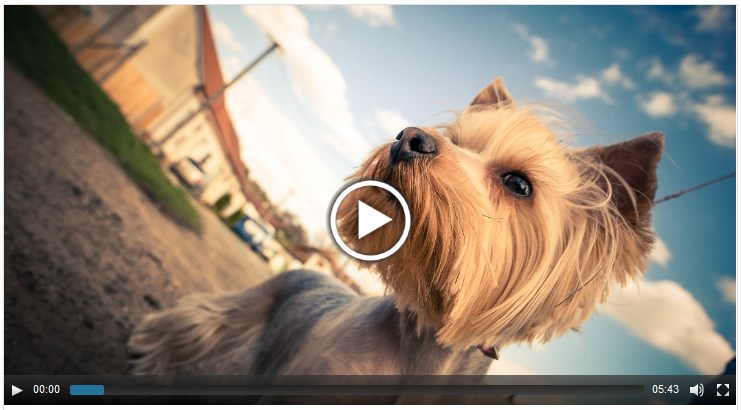
To add a video to your post, simply input the youtube our vimeo URL within the post editor, or use the "Add Media " button to upload and embed your own video file.

- If you want to use a video file hosted on your site, the file should be m4v ,ogv and webmv formats.Copy the URL and put it in the box No. 1 according to the format of the file.
- You can customize an image to show up in beginning of the video.
- For the use of video hosted in youtube or vimeo , Copy and paste the URL and put it in this field.
- You can embed the video code .
6-3.2 : Using The Audio Post Format
Selecting the Audio post format will display an audio player on your post.It will be put down the standard Thumbnail image. After you have selected the "Audio" post format from within the Format options box, the next thing you need to do is add a Audio to your post.
To add an audio file to your post, use the "Add Media" button to upload your audio file., Or simply input the SoundCloud url , or use the embed code.

- If you want to use a Audio file hosted on your site, the file should be MP3 ,OGA and M4a formats.Copy the URL and put it in the box No. 1 according to the format of the file.
- For the use of Audio hosted in SoundCloud , Copy and paste the URL and put it in this field.
- You can embed the Audio code.
- Activate the Auto play and hide Art Work.
6-3.3 : Using The Gallery Post Format
The gallery post format will display a gallery of images at the top of your post. It will also replace the standard Thumbnail image on post page with an image slider. Once selected, the Gallery post format will use the first gallery that you added to your post.

Galleries can be added to your post using the WordPress Media Editor. Simply click the "Add Media" button to create a gallery and add it to your post.

6-3.4 : Using The Quote Post Format
The Quote post format will display a stylized quote at the top of your post. The quote will also replaced the standard Thumbnail image on post page. Once selected, the Quote post format will use the first Blockquote in your post as the quote content.

Block quotes can be added easily ,Copy the text to be quoting then paste it In the field , You can also put the author's name.

6-3.5 : Using The Google Map Post Format
The Google Map post format will display a Map at the top of your post. It will also replaced the standard Thumbnail image on post page.

Google Map can be added easily ,input the Google Map url

6-3.6 : Post Settings & Options
Htmag Includes with a large number of options that allow you to control the properties of the Post page. You can change the color, background and place of the sidebar and enable or disable all options related to the page.

- You can show or hide these options in this post ,Leaving it blank will take from theme options.
- You can customize the sidebar place, Right, Left or hide it,Default setting will take from theme options.
- Select your custom sidebar ,Default setting will take from theme options.
- You can disable the default banner ,or add a custom banner in the post page.
- Click on the small box to choose the main color,Which will Replaces the default color in this post.
- you can set a custom Color and Background for the post.
6-3.7 :Reviews System
Htmag includes a built-in Review System which allows you to add amazing ratings and reviews to your posts and pages with 3 different style Stars,percent and points..

- Enable Review? - Check this to enable review box for this post.
- Enable User Ratings? - Check this to enable to allow users to vote.
- Criteria: Enter the Review Criteria title.
- Criteria Score :Enter the Review Criteria score
- Rating Type: You can use either Stars ,points or percentage format to display rating in the box.
- Criteria Header: A heading text can be set for the review box. If no heading text is provided, the review box header is hidden.
- Rating Tag: Enter one word for Rating Tag, such as "Awesome".
- Longer Summary: Enter a few line summary of the review. You can use advanced shortcodes here too.
- Position: You can either display the review box at top , bottom or floated
6.4 Related Articles
This element displays posts related to current article, based on Category ,Tag or Author relation.
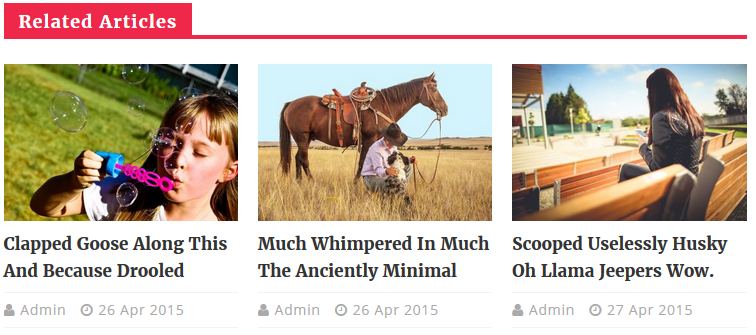

How To Display Related Posts
- Navigate to WP Dashboard > Theme Options > Post Settings >Related Posts
- Choose show to enable or hide to disable.
- Set the numboer of posts to display .
- You can show or hide item description.
- Choose between Standard or Scroll.
- Choose the Query Type to get WordPress posts:
To display Posts from Category, set Query type as Category.
To display Posts by tag, set Query type as Tag .
To display Posts by author, set Query type as author .
6.5 Article Settings
From this section you Control and Manage all Article features ,meta information,image,author box ,share buttons ,Relted posts and more ...

7-1 Create A New Page
You can create an unlimited number of pages. HTmag includes several page templates to choose from, and you will need to choose the page template that suits your needs. All of this is done in the pages section of your wordpress admin.

- Default: The default page has a container.
- Authors List: Use this template to create a list of blog authors.
- Blog list :Use this template to create a list of blog.
- Contact: this is the contact page template that you should choose when you make your contact page with google map & contact form .
- Display feed :Use this template to create a list of feed.
- Sitemap: This is a special template only to be used to create a Sitemap page as shown in the demo.
- Tags :Use this template to create a list of tags.
- Timeline :Use this template to create a list of post.
7.2.0 : Create A Contact Page
Setting up a contact page requires that you install the "Contact Form 7" (go to Appearance > Install Plugins if you have not already installed it).
7.2.1 : Contact form
After you install the Plugins You must create a Contact form- Go to Contact and edit the default contact form (Contact Form 1).
- Replace form content with this:
<div class="row-fluid">
              <p class="span4 field"> [text* name  placeholder "Name :"]</p>
              <p class="span4 field"> [email* Email  placeholder "Email :"]</p>
              <p class="span4 field"> [text* Subject placeholder "Subject:"]</p>
			  </div>
              <p class="span4 field"> [textarea  Message placeholder "Message :"]</p>

              <p class="submit-wrap"> [submit "Send"]<input class="wpcf7-clear" type="reset" value="Clear"></p>
Step 1
For more information, refer to Contact Form 7's FAQ and Docs.
7.2.1 : How To Create The Contact Page
- Create a new page, and give it any name you wish.
- In the Page Attributes box on the right hand side, set the Template option to Contact from the dropdown menu.
- Go to Contact form again. Copy the code under Shortcode column.
- Insert your content into the editor field, such as a heading and text,Paste the shortcode where you would like your contact form to appear.
Theme Options > Contact . The Contact tab also holds various options to customize the map and its various elements.

7.3 : Display Feed Page Template
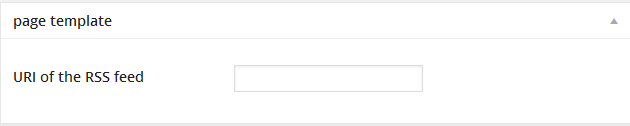
- Choose Display Feed page template,from the Page Attributes box
- the Display Feed template Options box will appears in the left main area ,type your Feed URL .
7.4 : Display Blog Page Template

- Choose Display blog page template,from the Page Attributes box
- the Display blog template Options box will appears in the left main area ,choose the Blog Style,the categorie and set the number of post to show .
8. Header Setup
Htmag allows you to show the Title site as a logo or select Custom Image Logo . We recommend that you use this option.. Go to Appearance > Theme Options > Header Options.
From this section you Control and Manage all header features ,logo,Top menu,Date,Social icon,Search box and Breaking news.
8.1 : Header styles
Htmagazine currently offers 2 different Header Layouts. Every style comes with a logo spot which powers up your web identity and a custom ad spot to maximize your income.
8.2 : Top Nav Bar.

- You can enable or disable the Top Nav Bar.
- Turn On this button to Enable the Date .
- Date Format - This option allows you to change how your dates are displayed. For more information please refer to the WordPress codex here: http://codex.wordpress.org/Formatting_Date_and_Time .
- Choose what you want to appear in the right hand side, Social Icons or Search Box.
8.3 : Adding The Logo.
- You will see two logo upload options, one is for standard desktop, the other is for retina ready devices. Click upload button and select your logo file.
- If you are uploading a retina logo (not required),.It needs to be exactly 2X the size of the regular logo .
- If you are using a retina logo, you must enter the logo width and height .
- you can set the margin for your logo.
- If you want to use the full width logo Turn On the button .
- To make your logo in the center of the header turn On the button.
8.4 : Sticky Menu.
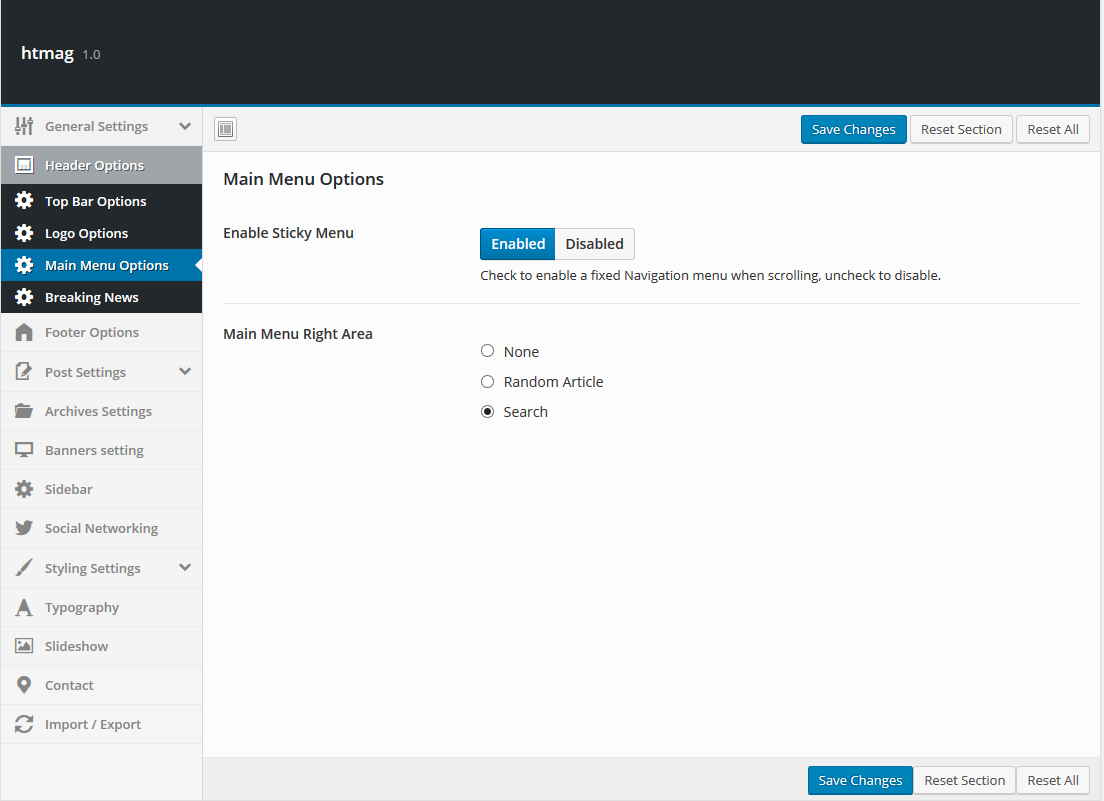
Turn On this button to enable fixed navigation menu when scrolling.
8.5 : Breaking News.
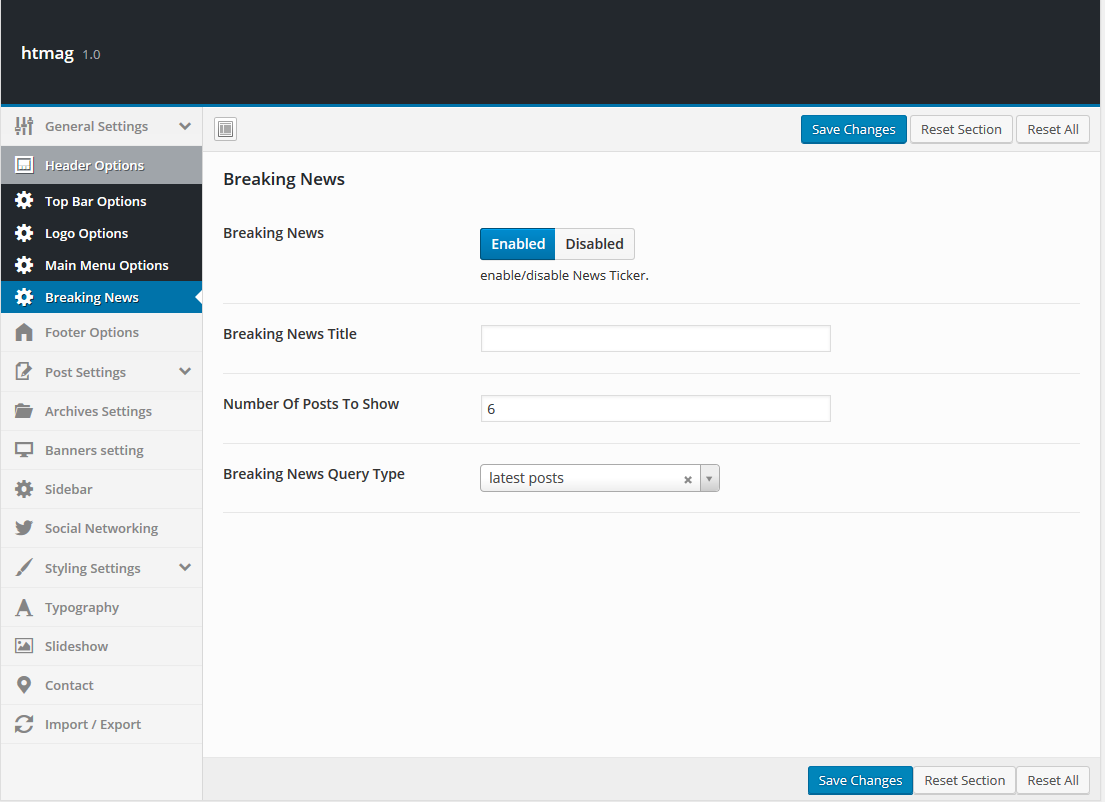
Enable or disable the news ticker, you can place a custom address , set the number of lines that appear and select news sourcer.
9. Footer
The Htmag theme comes with 8 footer styles. It consists of three parts ,The head area the widget area and the copyright area. can be configured in Theme Options on the Footer tab.You can now customize the footer by adding text, widgets,logo,menu or social icons .
The widget area consists of 4 total columns, and each column can have its own set of widgets. You can select to show 1, 2, 3 or 4 columns in the footer widget section, whichever column width you choose will allow the widget area to stretch the full width of the column. Footer widgets are added in the widget section of your admin. The following sections will cover each of these aspects of the footer that are listed below.

Footer Area
- The head area.
- The widget area.
- The copyright area.
How To Setup The Footer

- Navigate to htmag > Theme Options panel > Footer > Footer Options to access the footer options.
- 1 : Footer Layout – you can choose the Layout for your footer. You have 8 different Layouts.
- 2 : Footer Logo – You can add logo to your footer, Click Upload and Select your logo image to upload .
- 3 : Footer Head Area – Click the button to show or hide footer head area.
- 4 : Copyright Bar – Click the button to show or hide footer copyright area.
- 5 : Copyright Text in this panel you can assign a copyright text very easily and you can choose to display the copyright symbol.
10.0 Sidebars & Widgets
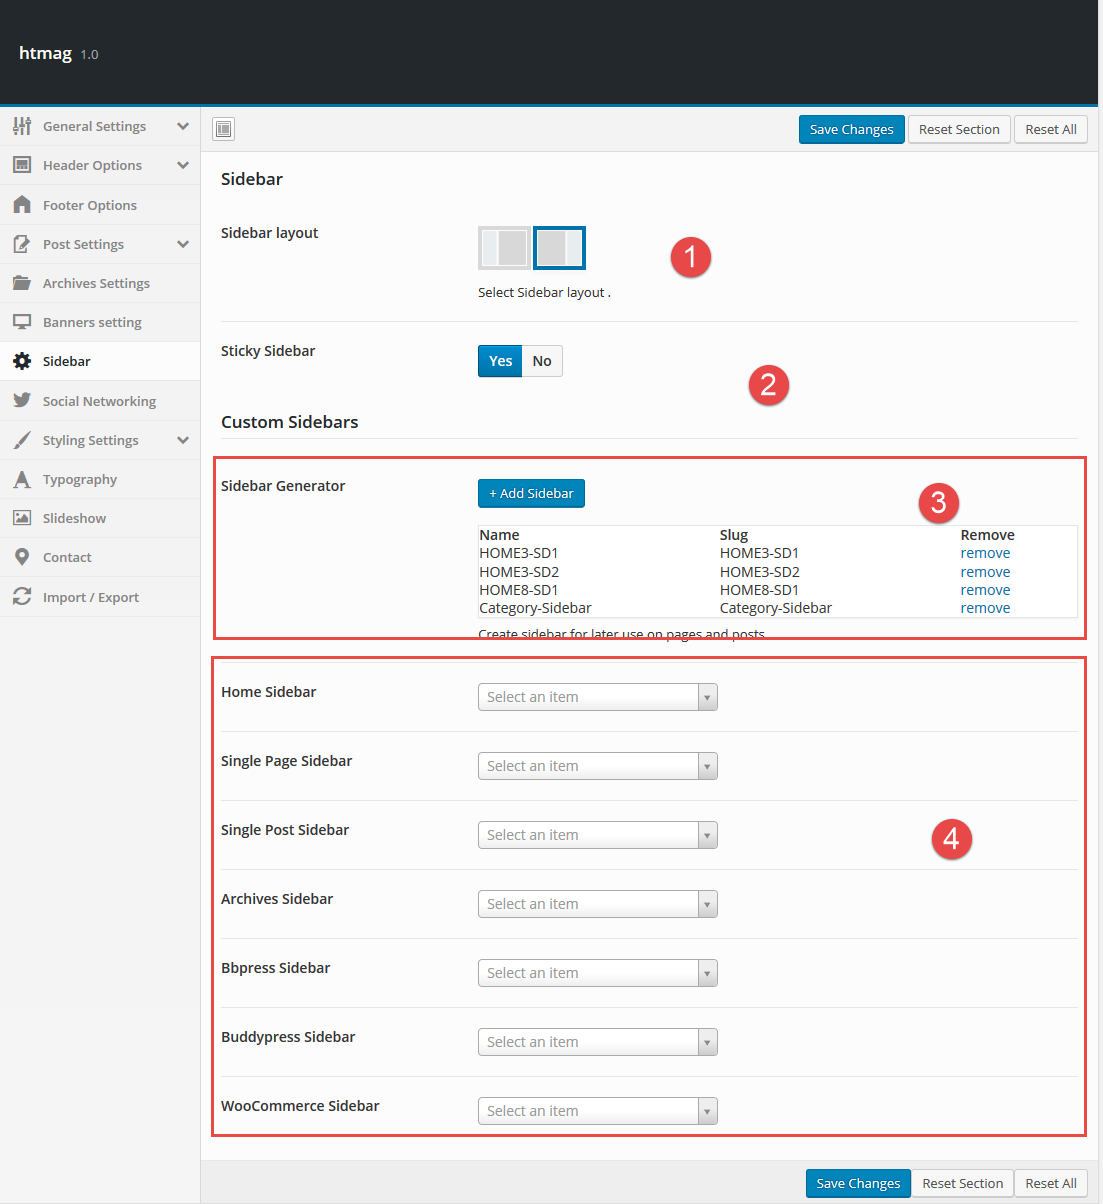
10.1 : Sidebar layout .
You have the ability to change the the default sidebar position. Choose which side of the page your sidebar will be on.
if you want use a Custom Sidebar Position for your pages or posts ,Choose the “Sidebar Position” From post edit page.

if you want use a Custom Sidebar Position for your Categorys,Choose the “Sidebar Position” From Category edit page.

10.2 : Create A Sidebar.
Htmag allows you to create an unlimited number of sidebars on the fly.Any sidebar can easily be applied to a page,post,home or Category . It’s a great way to customize each page with a unique sidebar. Please see the steps below to understand how you create a sidebar.
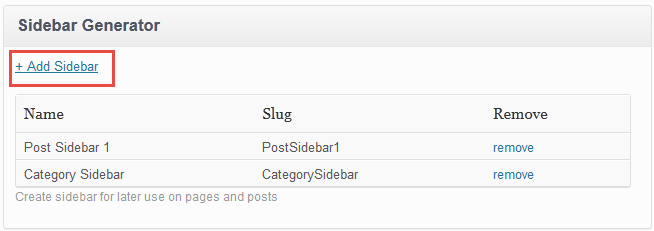
- Click the “Add Sidebar” .
- Give it a name and click ok . You can add as many sidebars as you need.
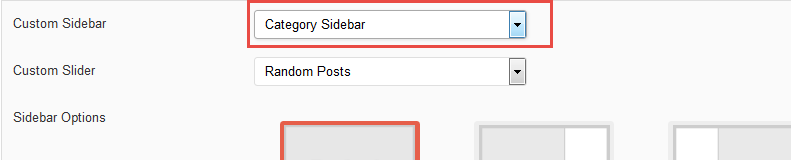
10.3 : Custom Sidebars.
After you are done adding new Sidebar, you can assign your Custom sidebar to Home , posts , pages or archives .

if you want use a Custom Sidebar for your pages or posts ,Select your custom sidebar from the Sidebar Options box in post edit page.

if you want use a Custom Sidebar for your Categorys,Select your custom sidebar from the Sidebar Options box inCategory edit page.
10.4 Widgets
HTmag includes several custom widgets. All widgets are accessed in the Widgets section of the WordPress admin. Widgets can be added to any sidebar, footer column.There are various fields and settings to choose for each individual widget; all are self explanatory. You can put as many widgets as you want inside of a sidebar or footer/sliding bar column. Please read below for information on how to add widgets.

10.4.1 : Add Widgets .
- Navigate to Appearance > Widgets to access the list of widgets and widget sections that they can be added to. The left hand side shows all the widgets you can use. The right hand side shows all the different sections you can add widgets to.
- Simply drag and drop the widget you want into the widget section you want on the right hand side.
- When finished, make sure to click Save in the widget editing box to save the widgets added to your sidebar.
11.0 Typography Settings
Htmagazine Theme has a fully customizable Theme Typography options where you can set custom, Google and standard fonts, font sizes and font line heights. Everything you need to adjust your website fonts you will find under the Theme options > Typography tab!

11.1 How To Change Theme Typography
Htmagazine have a huge bunch of options to change and customize typography in easy way.
Navigate to WP Dashboard > Theme Options > Typography : If you want to change the Main Font , Heading Font etc. choose the font the font weight, font size , line-height,Color etc. and Save Settings.

Typography Options Setup
- Font Family :this option allows you to select a font family to use.
- Backup Font Family :this option allows you to select a backup font family to use incase the primary font doesn’t load correctly.
- Font Weight and Style : this option allows you to select a font weight and style to use.
- Font Subsets : this option allows you to select which subset to use.
- Text Align : this option allows you to set the text alignment.
- Text Transform : this option allows you to set the capitalization of a text.
This property is used to change the text to uppercase, lowercase or to capitalized. - Font Size : this option allows you to set the size of the text on display.
- Line Height : this option allows you to set the spacing between lines.
- Word Spacing : this option allows you to determine the distance between wordss.
- Letter Spacing : this option allows you to set the spacing between letters.
- Font Color : this option allows you to set the color of the text.
12.0 Slideshow Settings


How To Display Slideshow
- Navigate to WP Dashboard > Theme Options > Slideshow
- Clic enable
- Select the silder postion and style
- Select play or stop .
- show or hide review scor
- show or hide slides caption
- You can show or hide item description.
- select Animation Effect.
- show or hide dots pagination.
- Set slider speed .
- set the number of post to show.
- Choose the Query Type to get WordPress posts:
To display Lasts Posts , set Query type as Lasts Posts.
To display Posts from Category, set Query type as Category then select a category in the dropdown menu.
To display Posts by tag, set Query type as Tag then select a tag name.
To display Selective Posts , set Query type as Selective Posts then Enter a post ID, or IDs seprated by comma in the Selctive Posts IDs input field .
13.0 : Banner Setting
Allows you to use the methods of multi ads, image ads , custom advertising and Responsive Google Adsense.This latter enables you to maximum benefit of Google ads where you will be able to show several sizes to advertise By using a Responsive technique
From this section you Control and Manage your banner ,for more information See the detailed explanation.
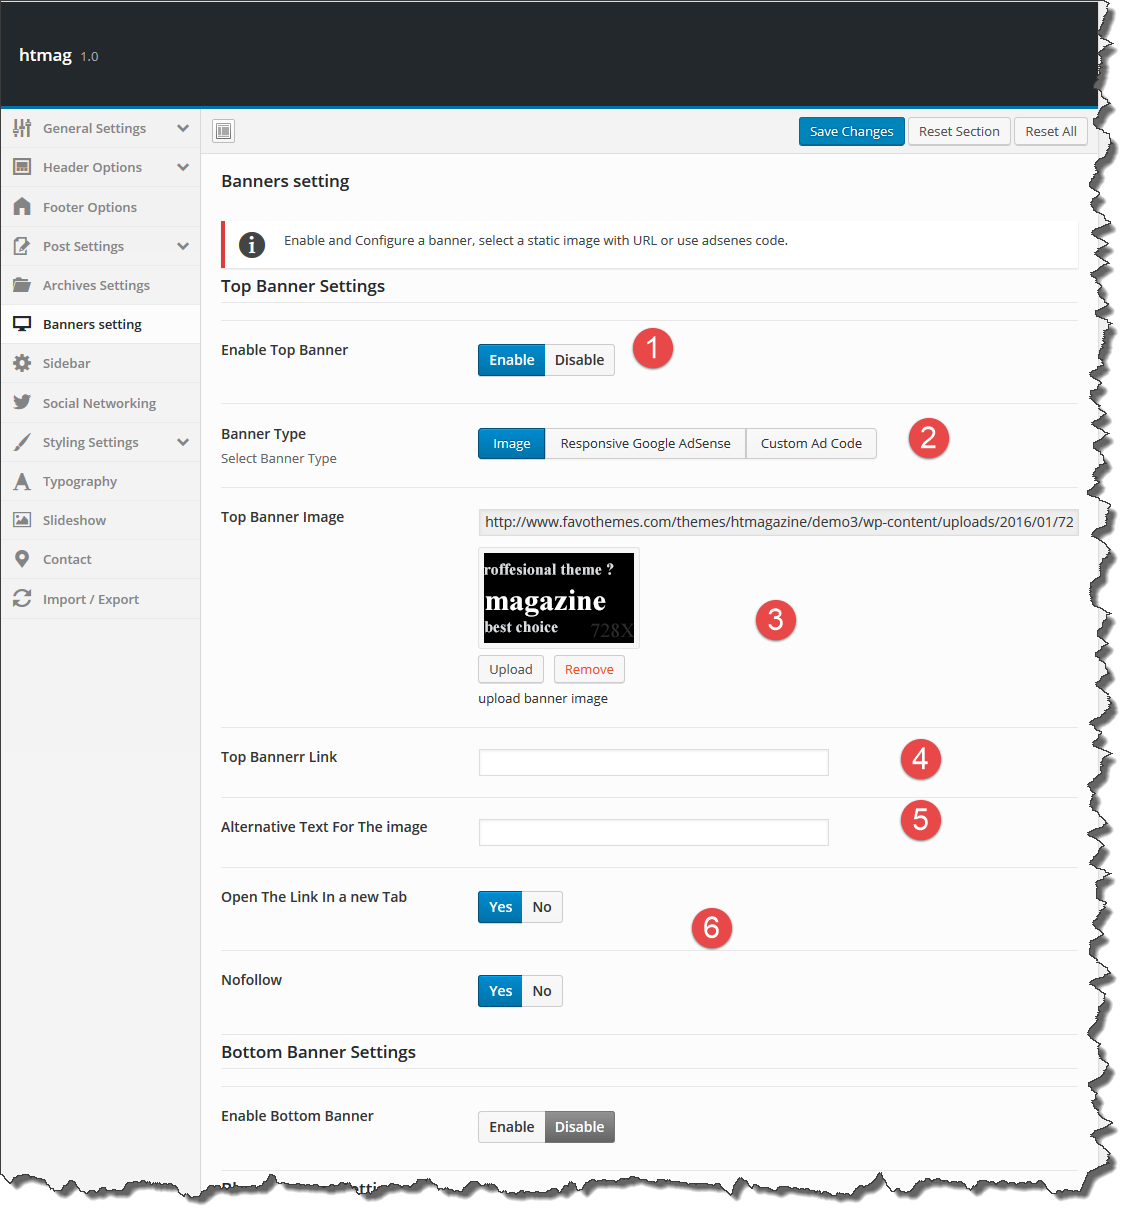
13.1 : Add an Banner image .
- Go to Theme Options > "Banner Settings" tab .
- Enable the Ads area you want.
- Click on "upload" and add your Ad image or post the image link if you want use External link.
- Add your Banner link .
- Add Alternative Text For The image (optional) .
- Enable "Open The Link In a new Tab" option If you want to open the link in a new window / tab .
13.2 : Responsive Google Adsense .


- Go to Theme Options > "Banner Settings" tab .
- Enable the Ads area you want.
- select Responsive Google Adsense.
- Enter Your publisher id code .
- Enter Your Ad Slots ID .
13.3 : Custom Ads Code
If you want to use other advertising code, Flash Advertisement or any a custom Ads use this option.
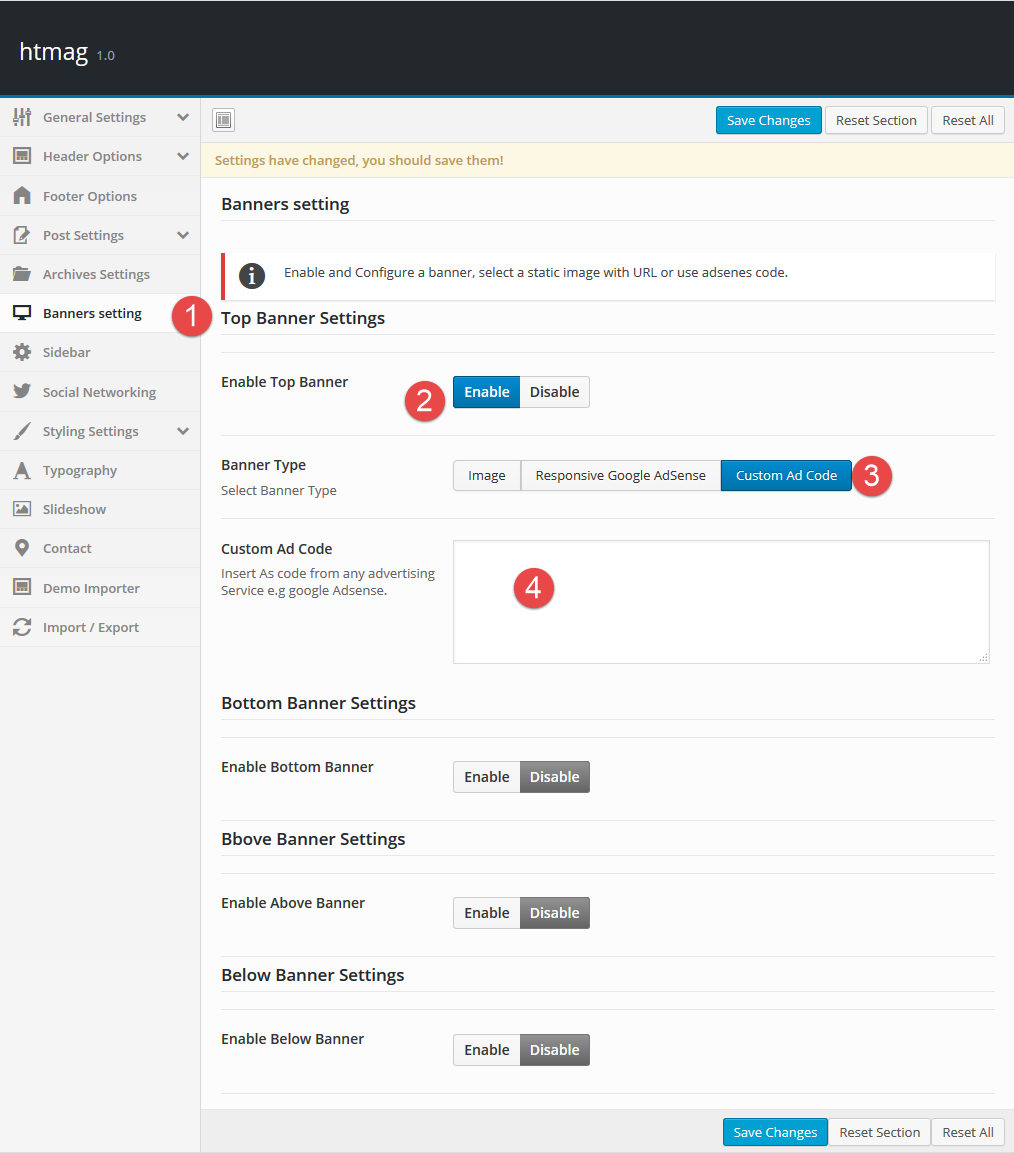
- Go to Theme Options > "Banner Settings" tab .
- Enable the Ads area you want.
- select custom ad code.
- Add your Ad code or custom html code in the "Custom Ad Code" input area.
14 : Translation & Internalization
This article will cover translating the Htmagazine theme into any language apart from the default (en_US). if you’d like to learn about translating plugins, here are some great articles you can check out.
WordPress Codex: Translating WordPress
How to Translate a WordPress Plugin
14.1 : Translating Theme (Customizer) Options
Htmagazine Comes with advanced and useful panel that help you to translate theme only in minuets without using any extra tools and technical requirement! Just go to theme options → Translation and translate the strings to your language.
14.2 : Poedit Translation
Htmagazine comes with .po and .pot file included under the languages folder. To translate the theme using Poedit you need to follow the next steps:- Download and install Poedit.
- Open htmag.pot in Poedit. Translate as needed.
- Choose the text to edit and enter your translation in the bottom box.
- Save your .po file according to language code followed by country code. If your translation is written in German, your file name will look like de_DE.po.
- Once you save, Poedit by default automatically creates the .mo file alongside with .po file.
- Upload the .po and .mo files you just created to your /languages folder so they are in the same directory as the htmag.pot
14.3 : Setting up the translation in WordPress
The final step is to tell WordPress which translation file to use for your website.

- Go to WordPress Dashboard > Settings > General
- Select your website langauge as shown in this screenshot.
14.4 : RTL Version
For languages that read from right-to-left unlike English which is left-to-right, will automatically switch to an RTL style, as long as you it's in your language and uses the correct locale...... check this page for more informations .
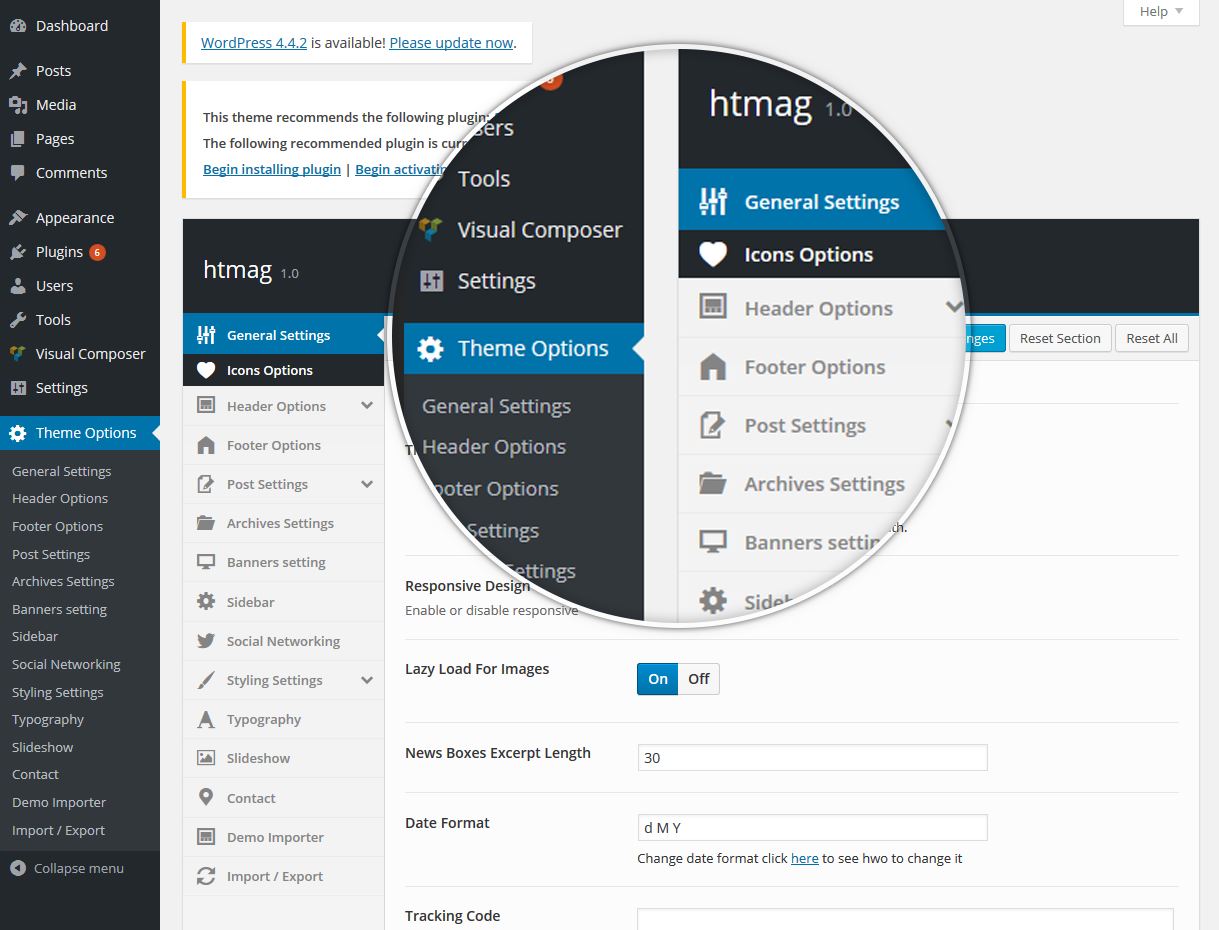
15 Theme Options
Htmag came with advanced Theme Options panel that is loaded with options. We have the options organized into logical tabbed sections, and each option has a description of what it will do on the front end. There are too many options to go over in these docs but please take some time and navigate through each tab to see what we offer. Go to Appearance > Theme Options in your WordPress admin to access the theme options panel. You can also backup your theme options by clicking on the backup tab. That is a great way to move your custom options from site to site. See below for screenshots of our theme options panel. Please note: we are always adding new options so these screenshots may not reflect the most up to date options.
Htmagazine Theme Option panel is easy to use and lots of options. You can Brand it your own way. Options backup able and our other themes information.
- General Settings
- Header Options
- Footer Options
- Post Settings
- Archives Settings
- Banners setting
- Sidebar
- Social Networking
- Styling Settings
- Typography
- Slideshow
- Contact
- Translation
- Demo Importer
- Import/Export
16. WooCommerce
One of great features of htmagazine is that you can make an online shop with it.
htmagazine is fully compatible with latest version of Woocommerce Plugin. We added required stylings to fit the design, and all required confiq codes to make it seamless with htmagazine. If you dont need Woocommerce simply dont install it and all the features, codes and anything required for woocommerce will not be loaded and interfered. Vice versa, if you need to set up woocommerce just install woocommerce like you do for other plugins and thats all about it. you dont need to do anything else.
17. Shortcodes
Htmag includes useful built-in Shortcodes ,Which allows you to add a lot of amazing additions To your Post or Page.
How to use Shortcodes
Shortcodes are added to any post, page or widget by simply adding the shortcode as shown in the examples below. Some shortcodes also have optional parameters so you can customize it even more.
When you go to edit a post or a page, you’ll find a Shortcode Generator button in the post editor window. This button allows you to insert any shortcode into your post or page.
Dropcaps
[dropcap ] A [/dropcap]
With style
             [dropcap style="style-1" ] A [/dropcap]

             [dropcap style="style-2" ] A [/dropcap]

             [dropcap style="style-3" ] A [/dropcap]
With style and Custom Colors
[dropcap style="style-1" color="#F600FC" ] A [/dropcap]
With style and Custom Colors ,background
[dropcap color="#FCDE00" style="style-3" background="#FC0000" ] A [/dropcap]
Highlight
[highlight] [/highlight]
List Style
[list ]
[list_item]ADD_LIST_CONTENT[/list_item]
[list_item]ADD_LIST_CONTENT[/list_item]
[/list]
[list type="line" ]
[list_item]ADD_LIST_CONTENT[/list_item]
[list_item]ADD_LIST_CONTENT[/list_item]
[/list]

[list type="star" ]
[list_item]ADD_LIST_CONTENT[/list_item]
[list_item]ADD_LIST_CONTENT[/list_item]
[/list]

[list type="yes" ]
[list_item]ADD_LIST_CONTENT[/list_item]
[list_item]ADD_LIST_CONTENT[/list_item]
[/list]

[list type="no" ]
[list_item]ADD_LIST_CONTENT[/list_item]
[list_item]ADD_LIST_CONTENT[/list_item]
[/list]

[list type="bullet" ]
[list_item]ADD_LIST_CONTENT[/list_item]
[list_item]ADD_LIST_CONTENT[/list_item]
[/list]
Table
[table]
Header 1	Header 2
Division 1	Division 2
[/table]
Columns
[one_half][/one_half]

[one_half_last][/one_half_last]

[one_third][/one_third]

[one_half_last][/one_half_last]

[two_third][/two_third]

[two_third_last][/two_third_last]

[one_fourth][/one_fourth]

[one_fourth_last][/one_fourth_last]

[three_fourth][/three_fourth]

[three_fourth_last][/three_fourth_last]
Message Box
[box type="secondary" ] Content [/box]

[box type="info" ] Content [/box]

[box type="success" ] Content [/box]

[box type="warning" ] Content [/box]

[box type="error" ] Content [/box]

[box type="download" ] Content [/box]

[box type="note" ] Content [/box]
buttons
[button color="red" size="small" link="http://" ]Button Text[/button]

[button color="red" size="medium" link="http://" ] Button Text [/button]

[button color="red" size="big" link="http://" ] Button Text [/button]
Tooltips
[tooltip text="Insert the text " gravity="nw"]Insert the text that will activate the tooltip hover[/tooltip]
Divider
[divider ] [/divider]

[divider style="double" ] [/divider]

[divider style="dashed" ] [/divider]

[divider style="dotted" ] [/divider]

[divider style="sep-stripe" ] [/divider]
Toggles
[toggle_box]
[toggle_item icon='user' title='ITEM_TITLE']ADD CONTENT HERE[/toggle_item]
[toggle_item icon='heart' title='ITEM_TITLE' active='yes|no']ADD CONTENT  HERE[/toggle_item]
[/toggle_box]
Taps
[tabs type="horizontal" Style="red" ]
[tab_item title='Tab1']ADD CONTENT HERE[/tab_item]
[tab_item title='Tab2']ADD CONTENT HERE[/tab_item]
[tab_item title='Tab3']ADD CONTENT HERE[/tab_item]
[/tabs]
[tabs type="vertical" Style="red" ]
[tab_item title='Tab1']ADD CONTENT HERE[/tab_item]
[tab_item title='Tab2']ADD CONTENT HERE[/tab_item]
[tab_item title='Tab3']ADD CONTENT HERE[/tab_item]
[/tabs]
Audio
[audio mp3="your url Here" ]

[audio m4a="your url Here" ]

[audio ogg="your url Here" ]
Accordions
[accordion]
[acc_item title='ITEM_TITLE']ADD CONTENT HERE[/acc_item]
[acc_item title='ITEM_TITLE']ADD CONTENT HERE[/acc_item]
[acc_item title='ITEM_TITLE']ADD CONTENT HERE[/acc_item]
[/accordion]
goole maps
[googlemap src="Insert Map Url " ]
Social Icons
[facebook][tweet][digg][stumble][Google][feedburner name="Feed Name"][pinterest][follow id="Username" size="large" count="true" ]
video
[embed]your url here[/embed]
soundcloud
[soundcloud soundcloudurl="http://" ]your url here[/soundcloud]
Lightbox
[lightbox full="Full Image Url" title="Lightbox Description" width="250" height="250" smal="Thumbnail Image url" align="right" ][/lightbox]